31 Ideal Tips for Taking Your Own Blog Head Shots
How to take professional-quality head shots without a digital photographer!
Two weeks earlier, I discovered myself in rather a situation: I wanted to buy brand-new business cards that included my photo, but I disliked virtually every single image on my computer system. Without the time or money to telephone a expert, I emailed a high school digital photography close friend to ask for her help. She sweetly agreed, as well as we planned a day for the shoot.
The day in the past, my friend dropped sick with a horrible cold. Although she still used to come over, I insisted that she remained in bed to remainder. Stressed over what to do, I explained the circumstance to my person when he got back from work, and also he instantly provided to break the cam shutter, regardless of not totally understanding exactly how my dSLR worked.
On Easter Sunday, with kids beyond of the park pulling apart bushes and delving into trees trying to find vivid eggs, we headed out for my head shot image shoot. An hour later, after plenty of laughes as well as a few funny faces, we climbed up back right into the vehicle to download and install the results.
In spite of my individual's statement that he had not been a wonderful professional photographer, the shots still turned out perfectly!
At some point throughout your blog writing occupation, you'll probably want to have your portrait taken as well. If you've just started and also are only make pennies-- or favor investing your regular monthly earnings on premium chocolate truffles as well as fancy restaurants-- a professional digital photographer might not fit right into your common spending plan. However if you follow my 31 simple suggestions for taking your own, you'll still wind up with excellent pictures for a fraction of the cost!
The Photographer
• Phone a buddy. Or a relative. Or your publication club leader. As long as they know exactly how to squint via the viewfinder and click the shutter, they're the perfect photographer! Additionally, select someone you're comfortable around and also who conveniently makes you chuckle. You may really feel awkward while standing in front of the lens rather than behind it, so it's actually beneficial to bring along a person who helps you loosen up.
• Have s/he wear comfortable garments as well as shoes. Depending on your picked place, your friend may squat, sit, twist, turn, or stand on her tiptoes to frame the excellent shot. Those placements could be cumbersome in a pencil skirt or a business suit, so prepare your digital photographer!
• Wear the exact same colored apparel. This is especially important if your professional photographer isn't one of the most camera-savvy individual on the planet. By using the same color, you can have them pose in your selected place while you establish the proper cam settings (ISO, aperture, shutter rate, etc) to attain one of the most lovely lighting exposure.
• Prepare s/he for how long the session could take. Generally, your image shoot will take in between 1-2 hrs complete from the moment you hoist your cam to when you break the lens cap back on. If you're both prepared for that time framework, neither of you will feel rushed or emphasized.
• Make sure s/he consumes beforehand. It seems ridiculous, but a hungry professional photographer creates a stressful-- and also reduced-- photo shoot. As well as most likely, neither of you will enjoy with the results! Load a few treats too, just in case, to make sure the session goes smoothly.
Your Appearance
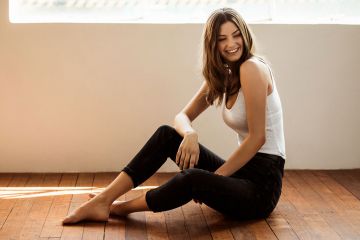
• For clothing, bear in mind the 3 C's: Classy, Comfortable his response & Confident. Some stylists warn versus putting on light shades or tank tops, however I completely neglected that guidance. I picked my favored outfit, a white number with lace that looked ageless and also flattering, due to the fact that it fit well and I felt rather in it. When you fit and also confident in your garments, you'll really feel extra comfortable throughout the shoot, and your pictures will certainly look all-natural and unwinded.
• Stick to neutral-colored make-up. I'm no make-up artist-- I had not brushed on eye shadow in years prior to my shoot!-- yet all-natural tones constantly look attractive. Look for tutorials on the internet if you need thorough support, and try out different looks during the week leading up to your picture session. However, if you put on bright magenta lipstick each day or teal eyeliner as your signature appearance, do not hesitate to use those for your shoot-- these pictures are intended to be the most effective representation of you as well as your look.
• Use sunscreen the whole week prior to. Less than 24-hour prior to my photo shoot, I rested next to my father at a baseball game in the bright springtime sunshine. I meticulously massaged sunscreen across my cheeks, but I took care of to miss the rear of my right shoulder. It transformed bright pink, but thank benefits the sunburn wasn't on my nose-- I would certainly've spent hours mastering the editing airbrushing strategy to eliminate that proof after my portrait pictures!
• Obtain your elegance remainder. Go to bed early, turn on a noise device, switch off your alarm-- whatever you require to do to stay clear of those dark baggy circles under your eyes! Yes, you can decrease their grayish color with makeup and also Photoshop, but absolutely nothing beats those extra Z's.
• Go barefoot. Or slide on flip flops. Or tie up your favored well-worn set of Reverse. Most of the moment, only your head and also torso show up in the structure, so use whatever shoes you feel most comfy in! Yet just in case you determine to take any type of full-length shots, bring along a great set you can conveniently slip into that matches your clothing too.
The Place
• Nature constantly looks classy. Some people have significant airy kitchen areas with bright marble kitchen counters, tidy white cupboards, as well as absolutely no mess visible. If you have among these, by all means take your head shots there! Otherwise, avoid on outdoors as well as find a peaceful, tranquil park. Deep earthy tones of environment-friendly as well as brownish constantly create a classic background!
• If outdoors, avoid too many signs of people. That gray concrete trashcan, those 6-year-olds laughing on playground swings, that red " Get after your pet" sign ... Those history nuisances all distract from your beautiful face, so stick with simple trees as well as flowers instead!
• Avoid or eliminate disruptive items in the background. A extension of the last idea ... If outdoors, establish your handbag and coat behind the professional photographer as opposed to next to your side, and also look behind you prior to she clicks the shutter to confirm no wayward youngsters or pets face the structure. If in your kitchen, clear the mess off of your kitchen counters as well as wipe up any roaming spills on the closets. We desire the concentrate on you, not your environments!
• Attempt to have a monotone color behind-the-scenes. Less disruptive, a single color makes certain that the focus stays on your face, however it does not need to be totally one shade. In my pictures, I chose differing tones of environment-friendly from the trees because they all belonged to the very same shade family members. You can try to choose a color that enhances your garments or makes your eyes pop, yet that's not essential. As long as it's subtle as well as suppressed, you're excellent to go!
The Shoot
• Choose a warm day. Natural sunshine is always the most effective illumination! Its radiance highlights the cozy tones in your skin, softening your functions as well as providing you the most flattering appearance.
• Select a warmer day. Like Goldilocks worried, the temperature level ought to be not too hot as well as not as well chilly! Above 90 ° you'll possibly be red-cheeked and also sweating, whereas you'll be shuddering with blue lips below 40 °. ( Simply guesstimates, naturally!) With moderate temperature levels, you'll really feel comfortable as well as look even more all-natural in your photos.
• Prevent windy days. Twisted hair whipping around your face as well as sticking to your glossy new lip gloss does not produce expert pictures.
• Shoot sometime in between mid-morning and also mid-afternoon. During these times, the sunshine is brightest and easiest to deal with. Although dawn as well as dusk look artsy, your professional photographer could not know just how to shoot in these low-light setups. Make it easier for her: clear your hectic schedule and also strategy as necessary!
• Establish your video camera setups with the digital photographer as the topic. This is why you asked for that your professional photographer put on the exact same color! Ask her to sit where you plan to pose, and also break a couple of shots to set the correct ISO, aperture and f-stops. (If that's Greek to you, simply use your electronic camera's automatic setup without flash.) If you both wear the same shade, it'll guarantee that your images end up precisely just how you anticipate after programming your video camera. While adjusting the settings, additionally confirm the background to eliminate any type of interruptions.

• Avoid odd lighting or darkness. This is specifically essential for those falling on your face. It's possible to melt as well as dodge in Photoshop later on to lessen-- however not get rid of-- them, so give yourself a running start as well as stick solely to pure sunlight or color. ( The good news is the darkness in the shot over weren't too bad!).
• No flash! The flash highlights uncomplimentary bluish skin tones as well as produces dark shadows behind you. Bad! By firing on a warm day, you should not require the flash anyway.
• Use at least 4 various backgrounds. Although one specific tree or cabinet might look ideal face to face, you could find upon downloading photos that a weird twiggy branch or small spot of tomato sauce ruined its surface area. Even more backgrounds raise your alternatives to collaborate with and practically assure that you'll fall for a minimum of one image!
• Shoot vertically. Generally, this is the most widely accepted positioning for portraits due to the fact that your body much better fills up the frame, and also it additionally aids you appear slightly longer as well as leaner. Schools print upright shots in yearbooks, services show them in their brochures, and also you can also mail them to your mommy for her refrigerator!
• Take at least 100 photos. Yes, that lots of. We're rather specific when it pertains to our own portraits. Consider it-- the number of school images did you in fact like? Break a selection of shots: some close-ups, some unabridged, some in between. In addition to regular upright portraits, you need at the very least 1 photo that plants to a square for your gravatar (that little photo that turns up next to your name in blog comments or on social media websites), so taking great deals of images increases the odds that you discover that unique shot!
• Bring props. Prepare your favored pasta, cook your award-winning cupcakes, or position with a slice of pepperoni pizza. Whatever you're well-known for, put that in the framework with you! Yes, you still need some solo shots for even more specialist setups (like calling card or visitor uploading for prominent brands), however those props will certainly aid you loosen up and avoid the awkward What-Do-I-Do-With-My-Hands Syndrome.
• Laugh! A chuckling smile looks even more natural and graceful than a forced I-hate-having-portraits-taken-please-can-we-be-done-yet one. One more reason to bring your friend or preferred family member: they recognize what knock-knock jokes make you laugh or just how to sing ridiculous tunes that make you smile!
The Editing and enhancing
• Pick 5-10 favorite pictures to modify. You may swoon over every shot, or you may battle to find a solitary one and also intend to neglect the shoot ever before took place. (If the last is true, a re-do is totally appropriate!) Picking somewhere between 5 and 10 photos provides you a affordable number to work with while avoiding the editing and enhancing procedure from taking 4 days to complete.
• Use an editing program you recognize with. Use Lightroom for your food images? Select that. Choose Photoshop? That functions too. I personally use GIMP, a free photo-editing software comparable to Photoshop. By modifying with a program you already recognize, it'll reduce potential disappointments as well as make the procedure go a lot quicker.